
Oracle published a document in June 2020 that walks CNC’s through upgrading the E1Local Oracle Database on the deployment server to meet Minimum Technical Requirements/Certifications with Tools Release 9.2.4. The original version of Oracle E1Local Database (OEE) installed with Oracle’s JD Edwards EnterpriseOne Application release 9.2 is E1Local OEE 12.1.0.2 (12c).
Oracle E1Local OEE 12.1.0.2 is supported only through Tools Release 9.2.5.x. As of Tools Release 9.2.6, the only E1Local Database supported with JDE E1 is 19.0.0.0.0 (19c). That means that every customer who wants to install Tools Release 9.2.6+ must be running with Oracle E1Local DB 19c.
Here is a link to the document Oracle published that will guide a CNC through upgrading to the E1Local Database – it’s named “19cLocalDepSer.pdf” and titled “Installing and Upgrading the JD Edwards EnterpriseOne Local Database to Oracle19c, Using the Oracle Database 19c as the local database on the Deployment Server”: https://www.oracle.com/webfolder/technetwork/tutorials/jdedwards/White%20Papers/19cLocalDepSer.pdf
This document was linked from the My Oracle Support document 2781564.2 (E1: MTR: DB: Frequently Asked Question On Deployment Server Platform Support/Certifications for JD Edwards EnterpriseOne 9.2.X Releases (Doc ID 2781564.2)) – under Local Database.
Step by Step: How to Upgrade the E1Local Oracle Database to 19c
This knowledge article will walk through each step in the Oracle 19cLocalDepSer.pdf document showing how to successfully upgrade the E1Local Oracle 12c Database on our deployment server to Oracle 19c.
Please note, that JDE E1 must be running on Tools Releases 9.2.4+ to be eligible for this OEE upgrade. Also, if you’re running the JDE 32-bit Deployment Server software, you will need the 32-bit Oracle 19c database client to connect to the Oracle 19c database. If you’re running the JDE E1 64-bit Deployment Server software, you will need to use the 64-bit Oracle 19c database client.
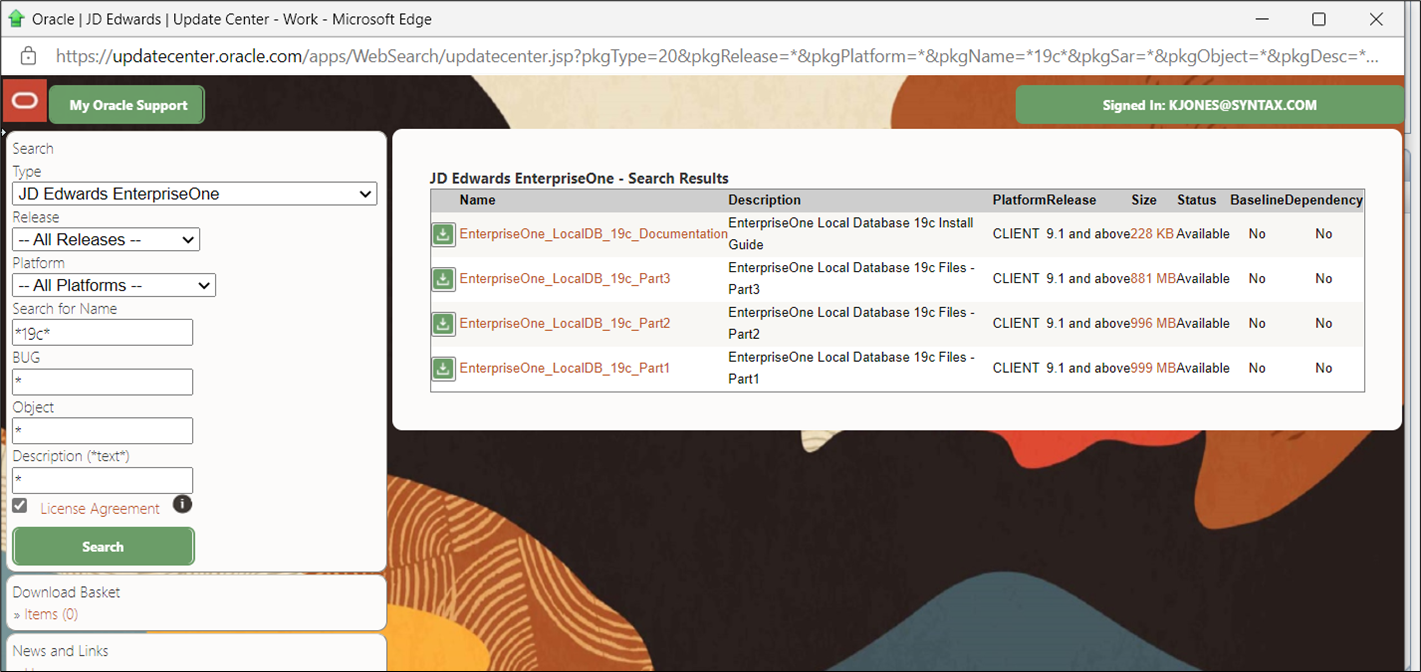
1. Finding the Download of Oracle DB 19c
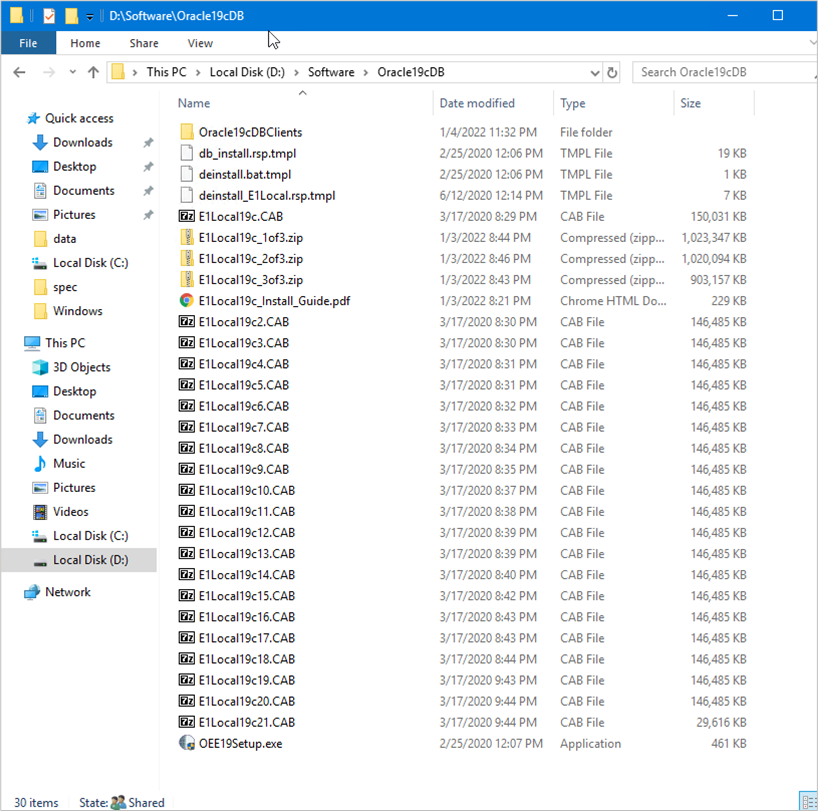
As is shown in the 19cLocalDepSer.pdf doc, Appendix A, Oracle has posted the 19c downloads on the Update Center. Search the Update Center for Type: JD Edwards EnterpriseOne and Search Name: *19c*. Select each of the 4 downloads and download to a directory on the deployment server that will be used to hold the 19c database software.
Download the Oracle DB 19c client software, 32-bit or 64-bit, from edelivery.oracle.com:
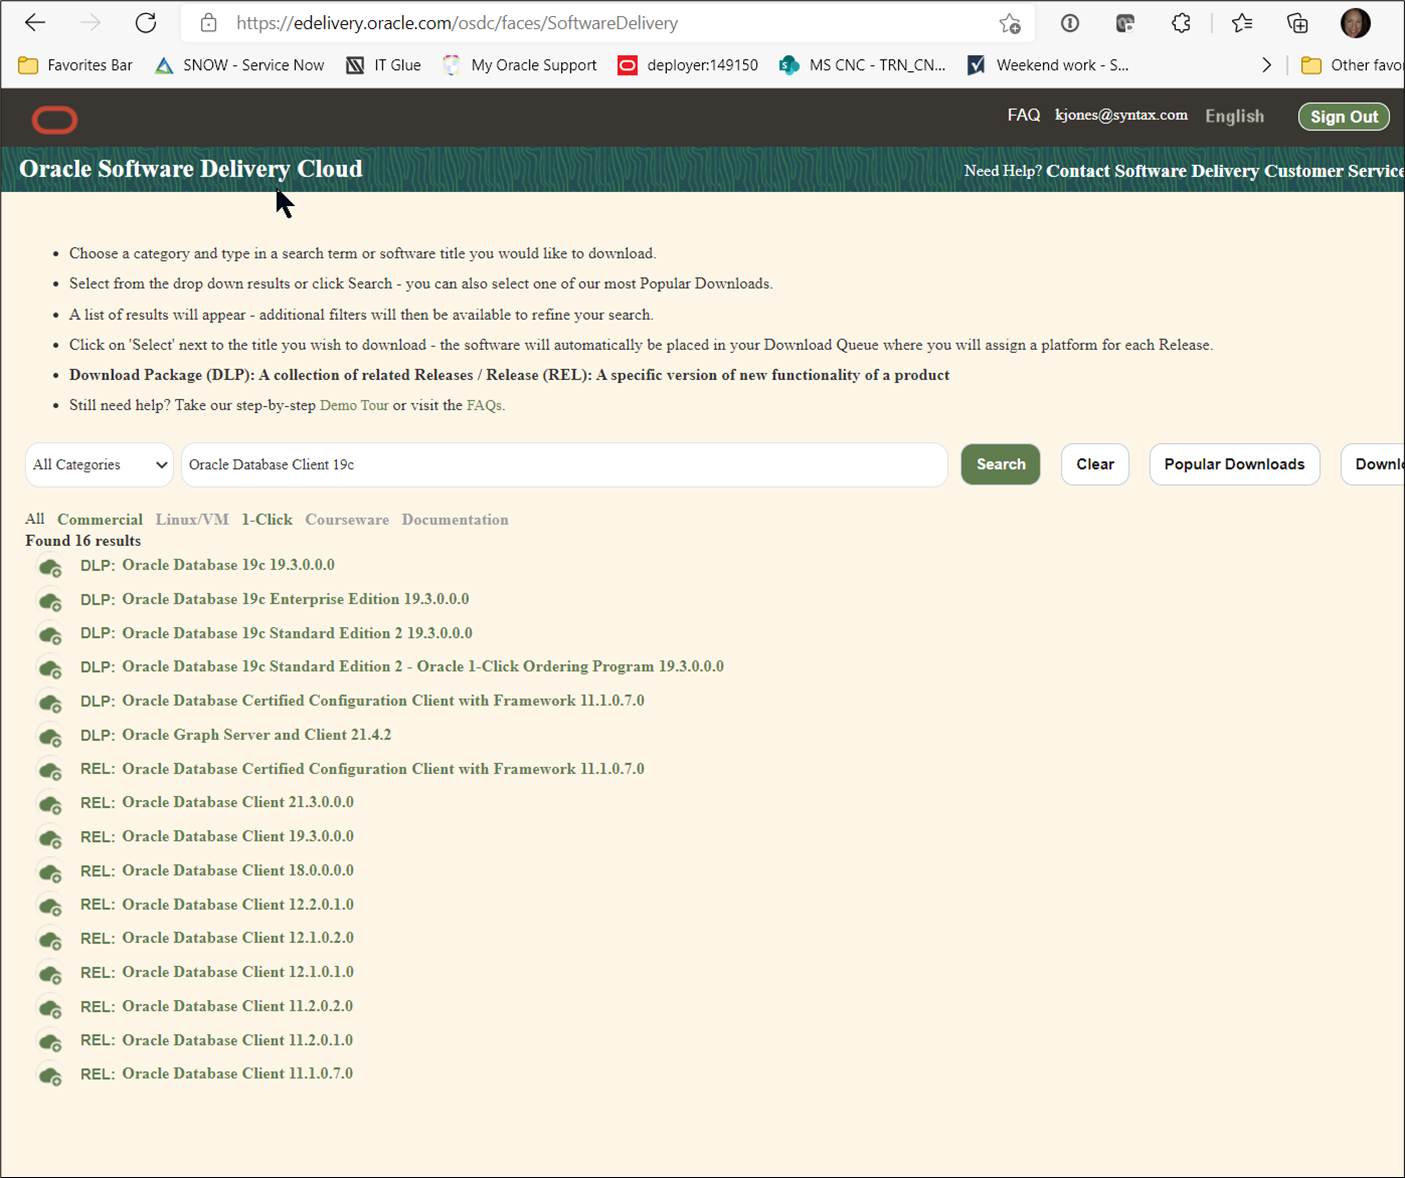
On edelivery.oracle.com, search for “Oracle database client 19c” and select the top result. NOTE: Oracle Database 19c (19.3.0.0.0) is the only available download as of this writing.
Uncheck all but the database client and download the Windows bitness that matches the JDE Deployment Server software you’re running. We will be installing the 32-bit Oracle DB 19c client.

2 – Export JDE Planner Oracle 12c Databases
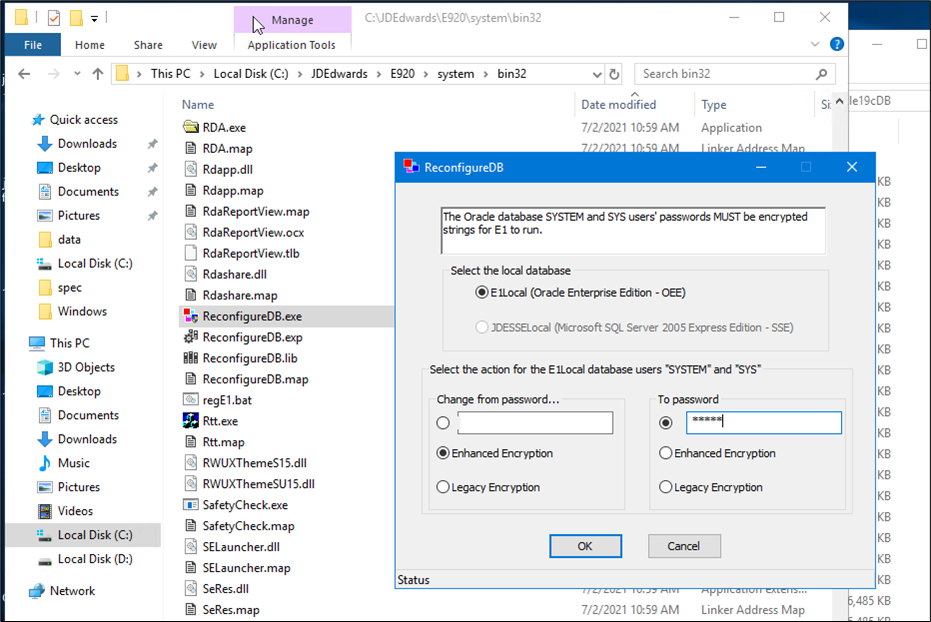
Under the section ‘UPGRADING AN EXISTING DEPLOYMENT SERVER TO USE AN ORACLE 19C LOCAL DATABASE’ in the 19cLocalDepSer.pdf, the first step after upgrading to Tools Release 9.2.4+ is to export data from the Oracle 12c E1Local database.
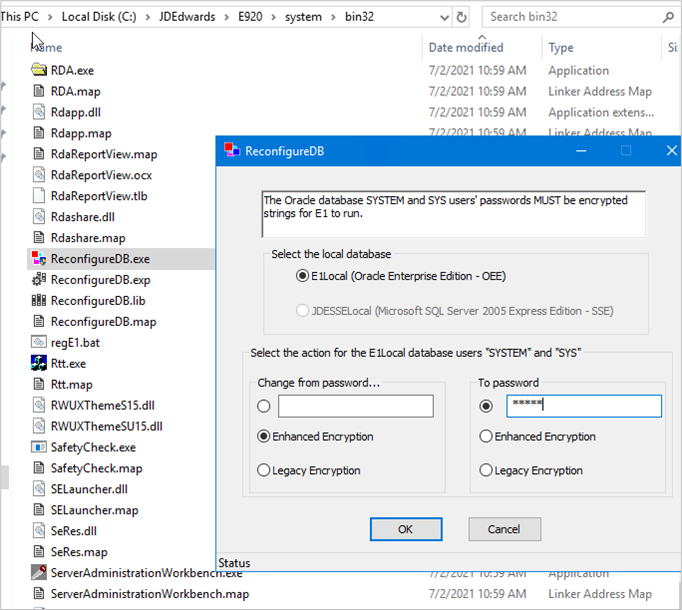
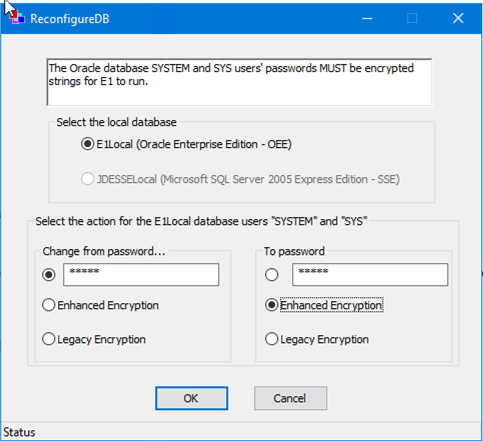
To do this you’ll want to run ReconfigureDB.exe. Right click and Run as Admin to set the password. The scripts already have the password set to ‘admin’ so to use the scripts, you will need to set the Enhanced Encryption password to “admin”.
It will ask you to confirm that password.
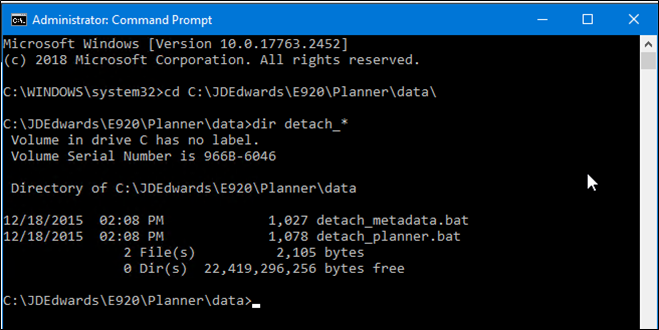
Open an elevated (Administrator) command prompt, navigate to C:\JDEdwards\E920\Planner\data, and use the detach bat files to detach the planner databases.
- Run – C:\JDEdwards\E920\Planner\data\detach_planner.bat
- And then run – C:\JDEdwards\E920\Planner\data\detach_metadata.bat
Each will run for a while and give you output as to the progress each is making in the command window. The final message for each database will be “Tablespace dropped”.
Detach_metadata.bat will drop this Tablespace (DB):
- SPEC_E920
Detach_planner.bat will drop these Tablespaces (DBs):
- JDECTL920
- JDEDATA920
- JDEDD920
- JDEOL920
- JDEPLAN920
- JDESY920
- JDEVL920
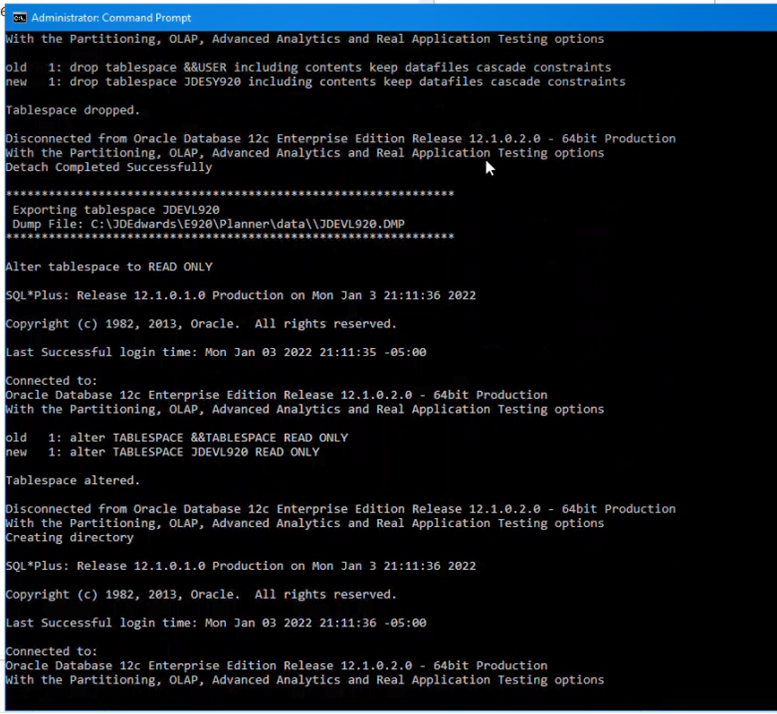
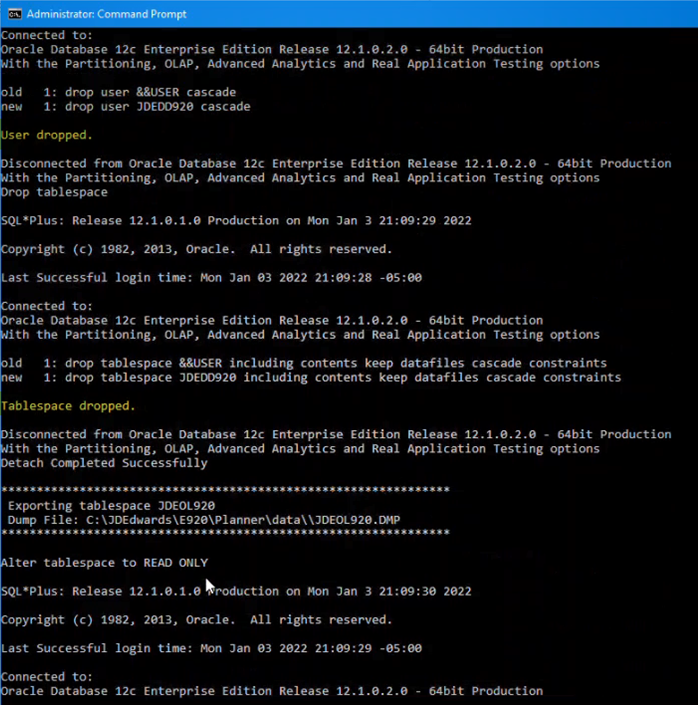
When all databases have been detached, review the export logs under c:\JDEdwards\E920\Planner\data for any errors:
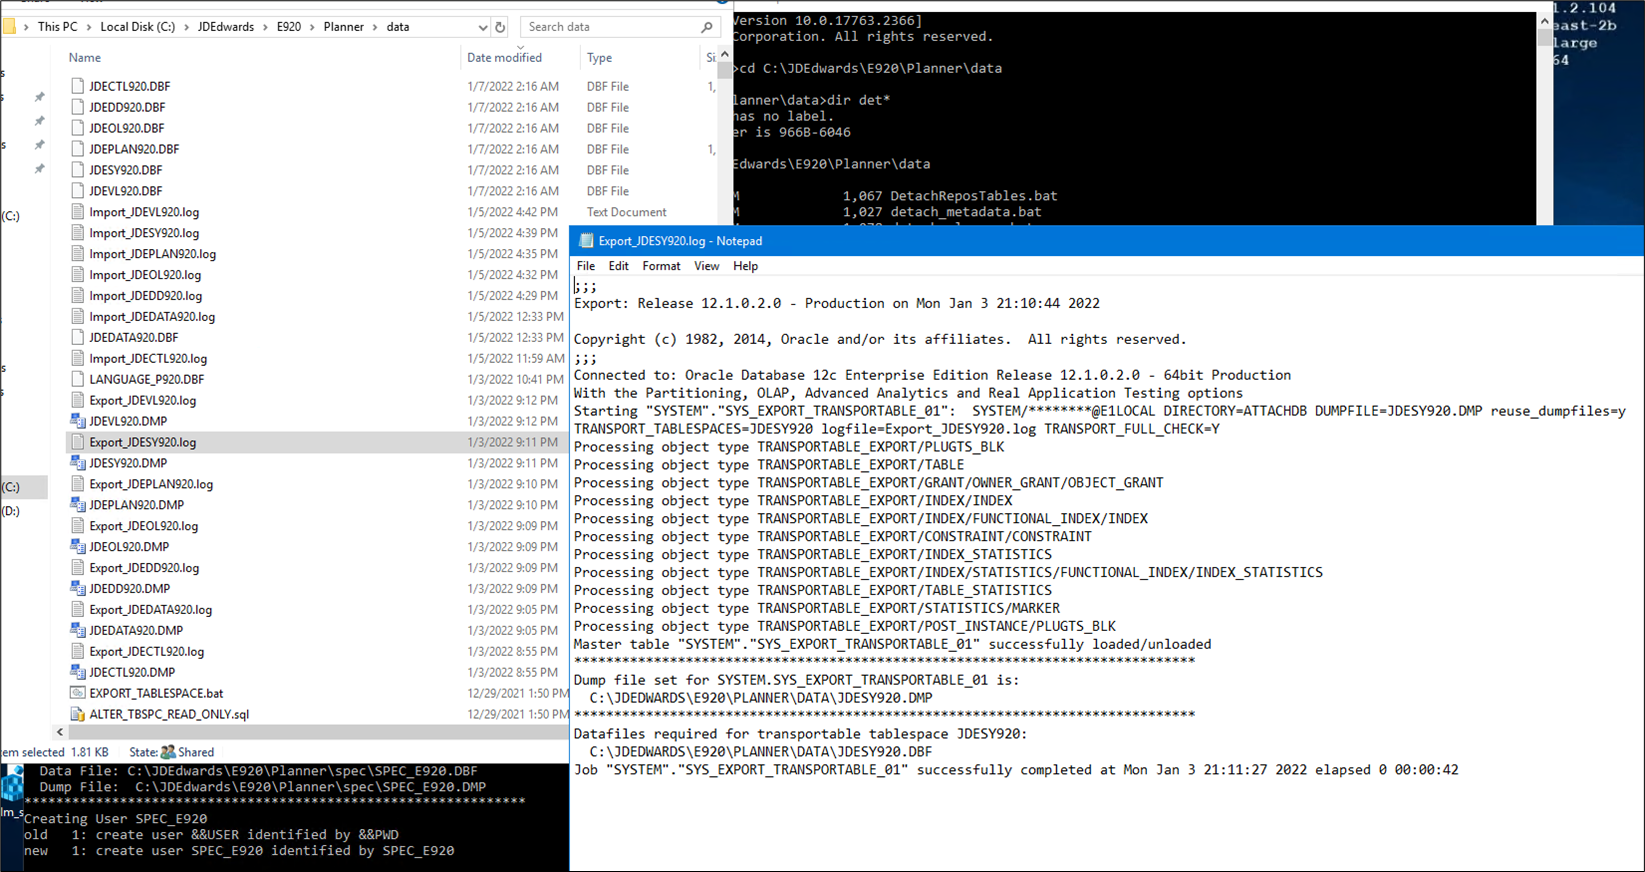
Make sure to run BOTH detach_planner.bat and detach_metadata.bat, otherwise not all databases will be detached from the 12c database.
3 – Uninstall Oracle 12c
Uninstall Oracle 12c by running C:\Oracle\E1Local\deinstall\deinstall.bat from a command line started with ‘Run as Administrator’. Restart the deployment server to complete the uninstall.
4 – Install Oracle 19c
Unzip all E1Local19c_Xof3.zip files into the same directory. I used 7zip for this because it maintains longer file paths than the standard Windows utility:
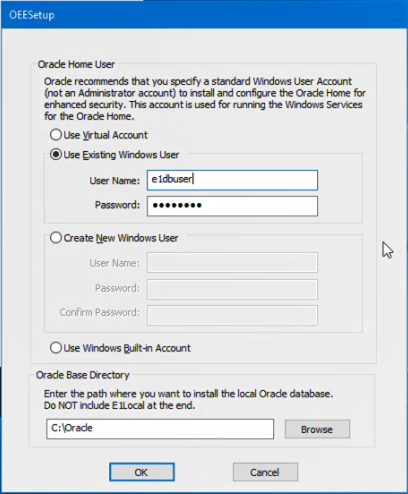
- Run OEE19Setup.exe. Make sure to Right Click and Run as Administrator.
I installed with the same Oracle Home Windows user that was used to originally install 12c – e1dbuser.
Install to a new Oracle Base Directory (i.e. c:\OracleDB), otherwise the installation may fail with the message: “The command failed with error 252”. If that happens, the installation is not complete (i.e. E1Local Windows Services do not exist and won’t be available at the end of the installation).
Here’s a screenshot of that error:
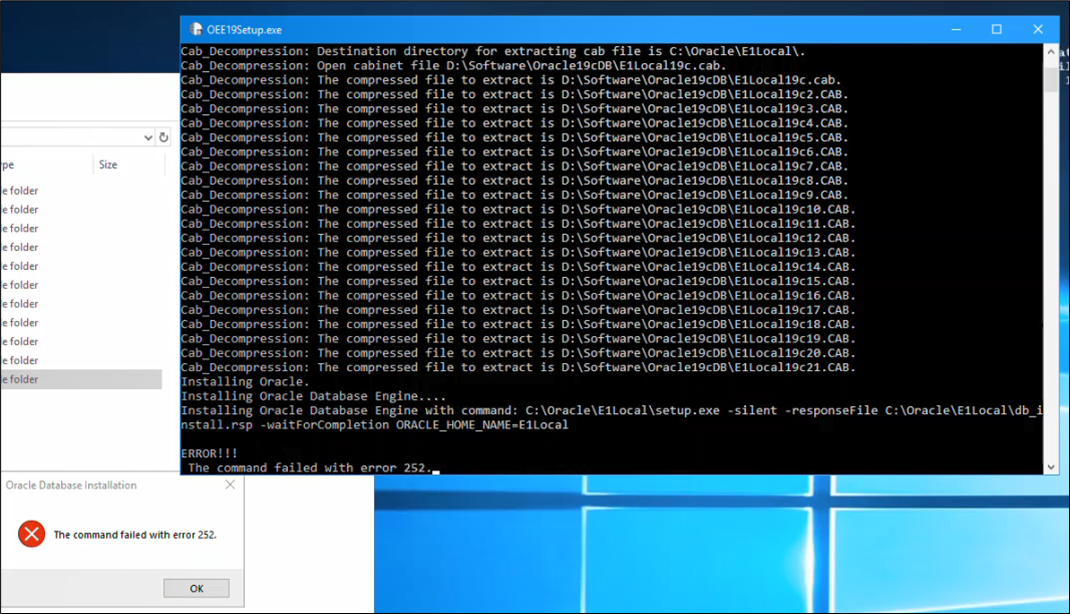
Make sure to follow the document for uninstalling OEE, including renaming the directories that were left over from the 12c install and cleaning up registry entries for E1Local. But again, if the error 252 comes up, select a different Oracle Base directory and that should resolve the issue.
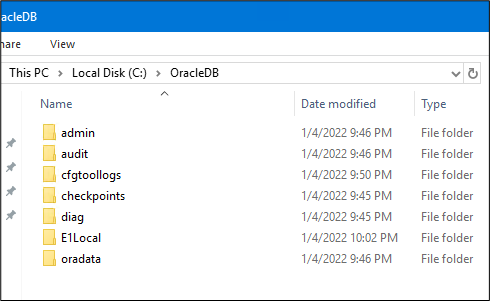
Successfully installed Oracle 19c E1Local Database directory structure:
Successfully installed Oracle E1Local 19c Windows Services:

5 – Install Oracle 19c Database Client
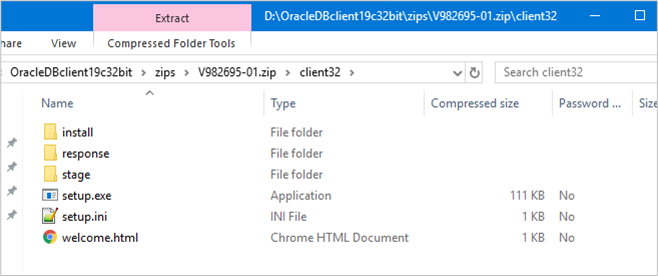
When you download the Oracle 19c DB client, there will be two zip files to choose from. The first is V982695-01.zip, which has the installer directory structure.
This is the zip file we will be using.
The second zip file is V982696-01.zip, which is a zipped directory structure. We will not be using this zip file; therefore, it is not necessary to download.
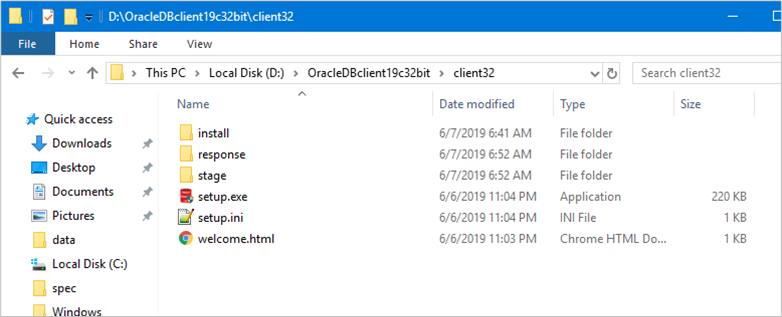
Extract V982695-01.zip to a software installation directory structure (i.e. D:\OracleDBclient19c32bit) and run D:\OracleDBclient19c32bit\client32\setup.exe by right clicking and selecting Run As Administrator.
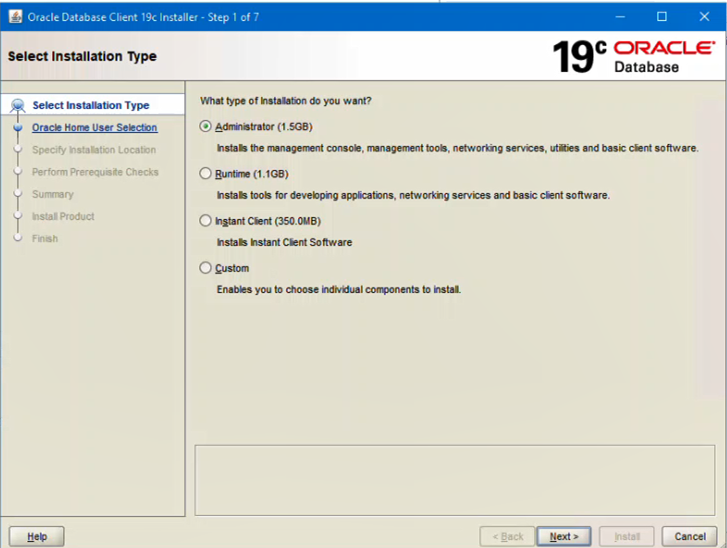
Select Administrator as the Installation Type:
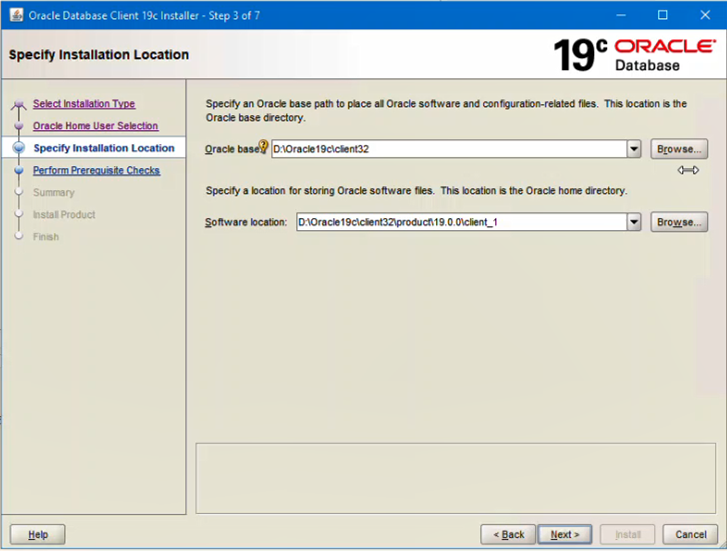
Choose a directory structure that makes sense for this installation:
6 – Apply the latest Oracle 19c DB client patch
The 19cLocalDepSer.pdf says to patch 19c client with Windows Database Bundle Patch 19.4.0.0.190716, 64-bit or 32-bit. The latest patch, as of Oct 2021, is 19.13.0.0.211019 which is the patch I used.
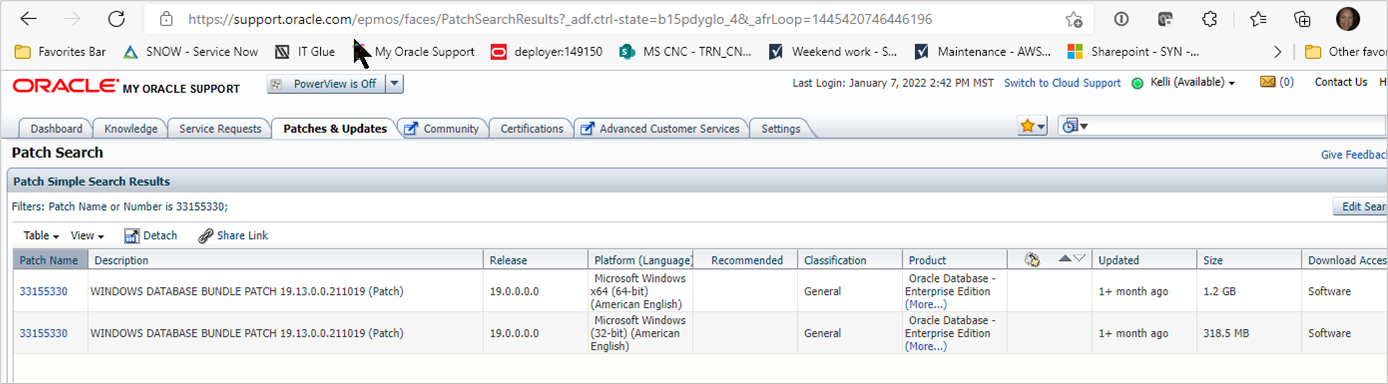
Download 32-bit for the 32-bit Oracle DB client and 64-bit for the 64-bit Oracle DB client.
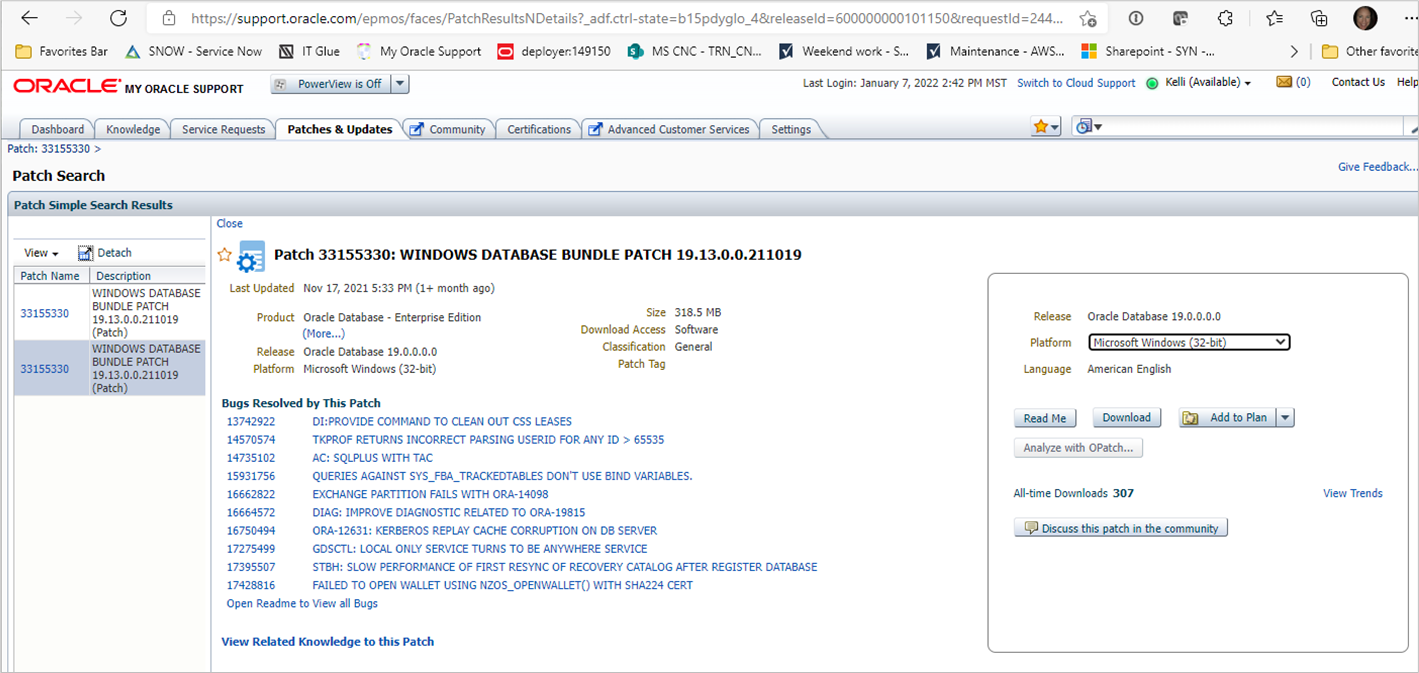
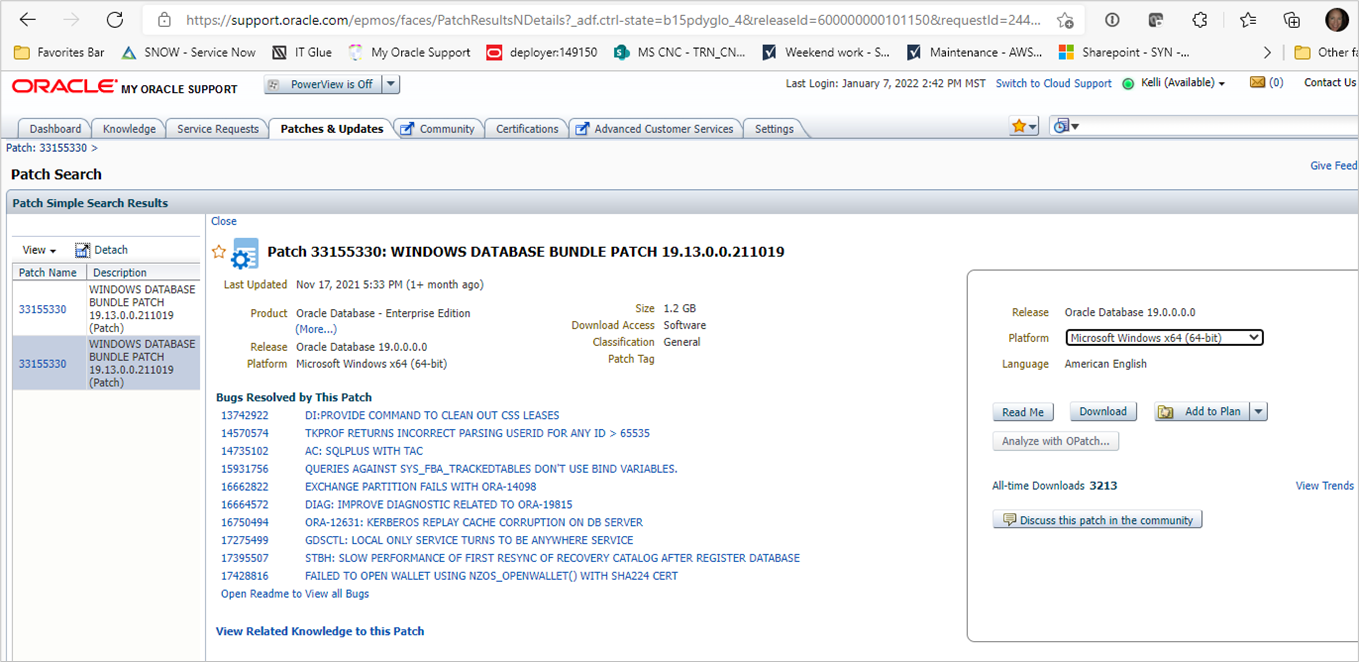
Patch OPatch first and then apply the 33155330 patch following the readme.html instructions.
7 – Copy the tnsnames.ora from the 19c Database installation to the client
- Copy C:\OracleDB\E1Local\network\admin\tnsnames.ora to D:\Oracle19c\client32\product\19.0.0\client_1\network\admin.
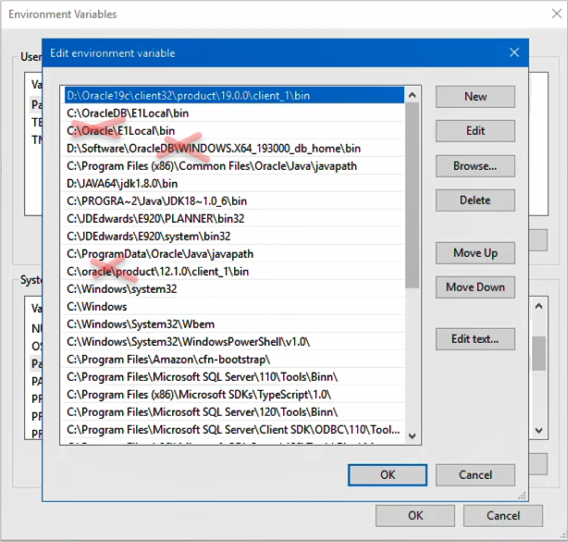
8 – Check the environment variables to make sure both 19c E1Local and 19c DB client are listed
Clean up the old environment variables pointing to the old 12c paths. Also, the order is important so make sure the Oracle 19c DB client is listed before the Oracle 19c E1Local database:
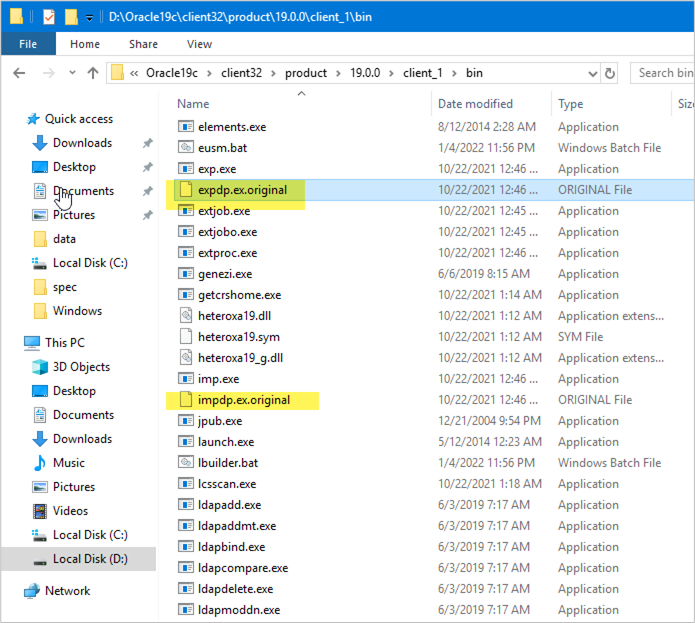
9 – Rename Oracle 19c DB Client impdp.exe & expdp.exe
As with Oracle DB client 12c, the Oracle DB client’s impdp.exe and expdp.exe need to be renamed so the E1Local database’s impdp.exe and expdp.exe will be used instead of the Oracle DB client’s set of exe’s. This is in the installation documentation under Installing a 32-bit Oracle Database Client – Step 4, Working with the Deployment Server (oracle.com).
Rename the expdp.exe to expdp.ex.original and impdp.exe to impdp.ex.original:
10 – Import Planner DB’s
- Run C:\JDEdwards\E920\system\bin32\reconfigureDB.exe to change the database password from Enhanced encryption to the password: admin
From an Administrator command line run:
- C:\JDEdwards\E920\Planner\data\attach_planner.bat
and then
- C:\JDEdwards\E920\Planner\data\attach_mtadata.bat
These two batch files will attach the planner databases that need to be there for the Deployment server to run successfully.
This is what the command window output will look like for each database:
- C:\JDEdwards\E920\Planner\data>attach_metadata.bat
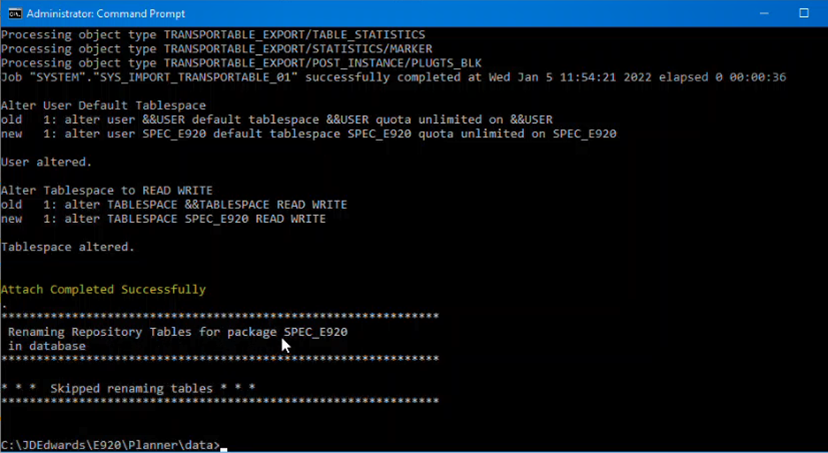
Make sure “Attach Completed Successfully” is at the end of each database import.
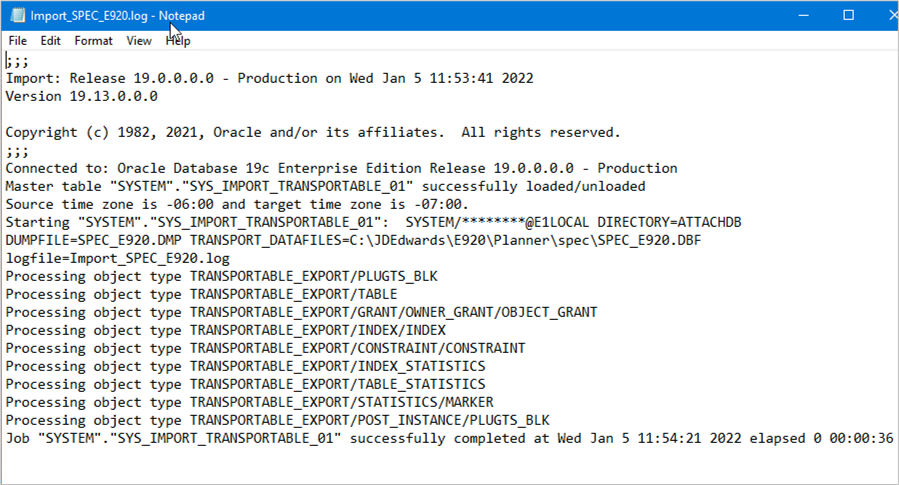
Also, check the import_TablspaceName.log files under C:\JDEdwards\E920\Planner\data and C:\JDEdwards\E920\Planner\spec to make sure there aren’t any errors in the logs:
Attach_metadata.bat will connect this Tablespace (DB):
- SPEC_E920
Attach_planner.bat will connect these Tablespaces (DBs):
- JDECTL920
- JDEDATA920
- JDEDD920
- JDEOL920
- JDEPLAN920
- JDESY920
- JDEVL920
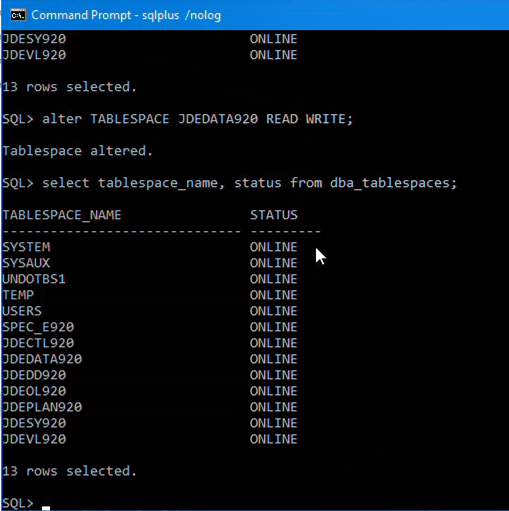
Check to make sure all tablespaces were attached in ONLINE status. If one or more is set to READ ONLY, alter the tablespace to READ WRITE:
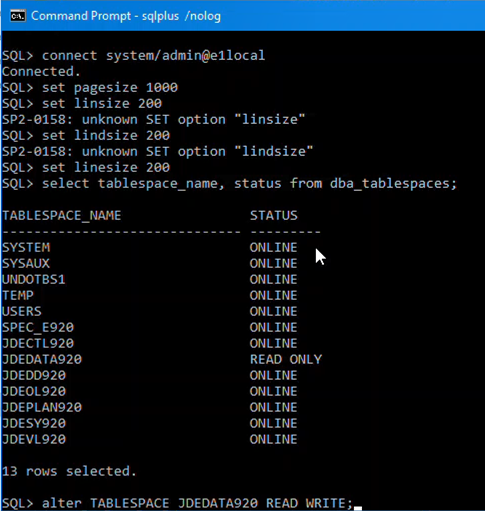
The result should look like this:
11 – Run ReconfigureDB.exe again to change the password back from admin to Enhanced Encryption
This gets JDE E1’s database passwords reset so E1 activConsole.exe will run and be able to connect to the databases.
12 – Log into E1
Now that databases are attached to the new Oracle 19c E1Local Database, log in JDE E1 activConsole.exe to make sure E1 can connect to the databases on this new version of Oracle E1Local.
Conclusion
The upgrade from Oracle E1Local 12c to 19c is not hard, but good documentation goes a long way to making this process easier. The Oracle document walks a CNC through the steps, but this knowledge document goes a bit further to show screenshots and the complete process from start to finish, including exporting tablespaces, installing the new Oracle 19c E1Local DB, installing Oracle 19c DB client software and patches, and then importing the tablespaces into the new Oracle 19c E1Local database. At the end of this process, the JDE E1 Deployment server E1Local Database will be up to the required software version to allow installing JDE EnterpriseOne Tools Release 9.2.6+.