
If you have not taken advantage of the Multi Grid feature in Smart View, you might be missing an opportunity to reduce your daily/weekly/monthly reporting maintenance. Many times I have seen workbooks with several ‘raw’ data retrieval worksheets that all ultimately feed into a ‘cosmetic’ formula driven sheet. Using the Multi Grid feature can help reduce or eliminate the need for that ‘cosmetic’ sheet. You can create the needed retrievals on a single worksheet.
Now let’s get to the ‘how to’. Below are the steps to get you started using Multi Grid from scratch:
- In Excel, connect to an available data source.
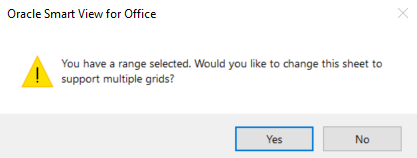
- In the worksheet, select a range of 4 or more cells (current doc says more than 1 but I found anything less than 4 just performs a standard ad hoc retrieval).
- From the Smart View Panel, right-click the data source (ie. Essbase database), and select Ad Hoc Analysis.
- Select ‘Yes’ to use Multi Grid.
- To create your second grid on the worksheet, select a different range of cells.
- From the Smart View Panel, right-click the data source (ie. A different Essbase database), and select Ad Hoc Analysis.
- Repeat as necessary to add grids to the worksheet.
Below are the steps to get you started converting an existing ad hoc worksheet to Multi Grid:
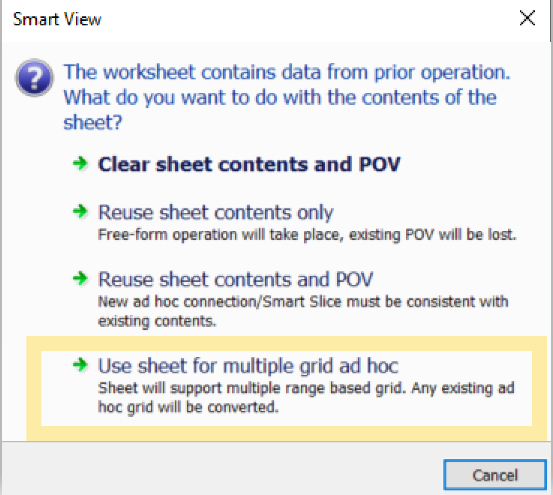
- In Excel, open a report/retrieval that you have previously created against one of your data sources.
- In the same worksheet, select a range of 4 or more cells (current doc says more than 1 but I found anything less than 4 just performs a standard ad hoc retrieval).
- From the Smart View Panel, right-click a new/same data source and select Ad Hoc Analysis.
- You will now see a new option, ‘Use Sheet for Multi Grid Adhoc’ in addition to the usual ad hoc connection choices.
General Tips:
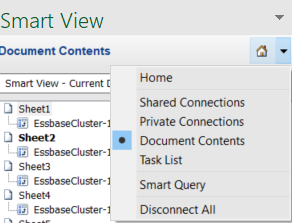
- Only use the Documents Contents section in the Smart View panel to manage the connections and ranges versus altering the names/ranges via Excel Name Manager.
- To manually add members (zoom, pivot, member selection are all available as well) I recommend inserting rows/columns within the grid to ensure you do not add the member outside of the grid range. If you are outside the range, no data will be returned for that member.
- When using Multi Grid, a few key ribbon features are disabled such as: Undo/Redo and POV. There are also some others disabled but I find these to be the most used.
- Sheet info is always a good checkpoint for the type of worksheet (ad hoc or multi grid) as well as connectivity. You can access that from the Smart View Ribbon by selecting Smart View | Sheet Info.
A couple of additional notes to consider:
- On Prem data sources can only be from the Essbase available connections. Since Planning does rely on Essbase, you can hit against a ‘Planning’ database via the Essbase connection but not the Planning connection. Therefore you would not be able to use the Planning bells and whistles with multi grid.
- For EPM Cloud, the available data sources include Planning, Planning Modules, FCCS, Tax Reporting. with the recent news that OAC will no longer use Essbase but instead Essbase being it’s own product, Essbase 19c, I can only assume multi grid behavior would be available but we will have to wait and see there.
Good luck!
Check out our Business Analytics Services